Showing posts with label pinterest. Show all posts
Showing posts with label pinterest. Show all posts
Wednesday, February 26, 2014
Overcoming Writer's Block: An Inspirational True Story (Part 2)
For two years, I did not write. I made due with journaling and poetry. But it wasn't the same. Sure, poetry was nice because I could write and edit the entire poem in a day or less. But it was not a novel. I wanted the drive, the writer's high, the sponge-brain I got from being creatively drained after a long day of writing. For two years, I starved for it. I had ideas, sometimes felt inspired. I'd sit down and...nothing. A few pages would trickle forth before the inspiration dried up.Where once I had a muse, now I had only wishful thinking.
This past December, I published the third Superiors Series novel and began reading over some old ya stuff I'd written. It wasn't bad. I dug through the files and inevitably landed on my favorite, the last novel I'd finished before writer's block set in. It wasn't bad, either. In fact, I got sucked in and read the entire book, editing a bit as I went. I thought I'd add some scenes between the protag and a future love interest and, to make it realistic, a few background characters.
It. Was. Like. Pulling. My. Own. Teeth.
The words did not flow. They were as hard to write as it is to read the inappropriately punctuated sentence above. Through much frustration, I forced what no longer came naturally. Then I went back to the first novel in the series, the unfinished one, and finished it. The ending wasn't great. I'll probably change it if I ever publish. It was more summarizing what I knew happened than showing the events unfold. But as I finished the few scenes, something began to happen. A bit-part character began to nag at me, circling like a mosquito. This had happened before, so I wasn't too hopeful.
Surrendering to the quiet nagging, I began to write the novel that was tentatively asking if it could be written. It petered out after a few pages, as most of my ideas over the past few years had. But my muse-troll had begun to scratch one stiff finger against the grimy, dust-covered block that had held me back for two years. Then it knocked a hole in the block and peered at me with its beady little eye. It taunted me with promises too good to be believed. I hated that thing by now. I told it to shut up.
It refused to be silenced. This story did not ask if it should be written. It demanded to be. So I began to write...painfully, haltingly, uncertainly. I made every excuse to procrastinate, distract myself, and avoid the call of duty. I spent hours pinning, unfollowing unfollowers, and exploring the creepy world of instagram hastags. I struggled through passages of my novel, rewrote, rearranged, deleted, added, rearranged again. It seemed an impossible task. How had I done this so many times before? Why was I putting myself through it again? And why on earth did I think I'd missed it?
I finished the novel last week, the first I've written in over 2 years. I'm still shaking off the dust, or, more aptly, chipping away at the block. But maybe, just maybe, I'll tear the whole thing down. If not, and this was just some sort of fluke...I've always got the backlog.


Friday, December 20, 2013
Disaster Chef: Lazy Crockpot Lima Beans

I started this meal how I start most of my meals: I had some time to cook. I didn't know what to cook. I went to the fridge and the pantry several times. I saw a package of beans I'd had for quite some time. I don't know anything to make with lima beans except succotash, so I went to Pinterest, like always. And I found this crockpot recipe from this blog. I had most of the ingredients, so I gave it a shot.

Here's what I used:
1 pound dried baby lima beans, rinsed and soaked
2 TBSP olive oil
1 onion, diced
1 bell pepper, seeded and diced
2 jalapenos, seeded and diced
salt and pepper
2 cloves garlic, minced
2 TBSP all-purpose flour
2 c./1 can chicken or beef broth and enough water to cover all ingredients (if uncooked beans, about 4 c. extra water will be required for cooking beans)
1 can crushed tomatoes/1 pint canned tomatoes if you do your own
1-2 c. kale, chopped (frozen or fresh)
1 can corn
1-2 c. leftover turkey or chicken (optional)
2 TBSP cumin
2 tsp chili powder
2 tsp paprika
1/4 tsp cayenne pepper
2-3 TBSP maple syrup
Toss everything in the crockpot, make sure it's all just covered with water, and cook 6 hrs on high or until beans are soft.

I added some Parmesan on top, because I add it to every soup, even when it doesn't go. I don't think the original recipe would have been enough for a meal, but with all the additions, it was a meal, not just a side dish, though it could serve as either. It's not my favorite, but I'd make it again if I couldn't think of anything else to make. Everyone ate it, and it didn't get complaints.
Recipe: 3 out of 5 spoons
Saturday, November 2, 2013
Scrappy Sunday: Exploding Box Project

 I have wanted to make one of these since I first saw it months ago. So, I made the cardstock box, but I never did anything with it. I wanted to save it to make for my husband for our anniversary. I saw it on Pinterest, but you really need to check out the tutorial on this website. It is AMAZING, so easy and simple. I followed the directions exactly and it turned out great on the first try.
 I finally had to stop procrastinating and make it a couple days before our anniversary. I used a line of 7 gypsies paper, I think it was called Lille? Anyway, I've had it for a while and I love it so much I don't want to used it, if that makes sense! But once I made the box, it was so gorgeous I didn't want to put pictures on it! I also used 7 gypsies ink for the edges of the patterned paper squares. I just used scissors to round all the corners. I will say, if you make this, be prepared to spend a lot of time on it. It takes just about forever to cut out all the paper to decorate it. I loved it so much I took about a million pictures!
I used a nut I found on the ground one day for the lid pull. It gave it a masculine feel. Even though all the boxes I've seen used a ribbon around the lid, I skipped that, as I wanted it to be masculine. I did use heavy duty glue on the lid to hold it together. Enjoy. And go make one!


Sunday, October 27, 2013
Scrappy Sunday: Honeymoon page, Scrap Our Stash (project pinterest)
I finally began the daunting task of scrapping our honeymoon. I saw this layout on Pinterest and knew I HAD to use the sketch, even though I admit, I usually can't get past the pet pictures. I know, I'm weird, but for some reason I just don't get them, even though I love our dog.
ANYWAY, I love, love, love this layout. I was going to use it for the intro page of a honeymoon scrapbook, but once I started it, the papers didn't match and it all looked horrible together. So I pulled off a bunch of stuff, and instead used an old packet of Making Memories stuff that I've had forever. I decided to do the Scrap Our Stash Tic-Tac-Toe challenge with the sketch. I'm actually going to use the sketch again, as I had to rotate it a lot to make it work, and I want to do a page from it that's pretty much an exact copy.
Here's the result:
 I used the row on the left of the tic-tac-toe board and used 5 brads, some washi tape I'm in love with, and some journaling spots from the Making Memories pack. The cardstock, brads, and washi tape by Paper Studio, ink by Around the Block, everything else is Making Memories 5th Avenue 8x8 pack. I usually think my journaling is too personal, so I'll add that later.
ANYWAY, I love, love, love this layout. I was going to use it for the intro page of a honeymoon scrapbook, but once I started it, the papers didn't match and it all looked horrible together. So I pulled off a bunch of stuff, and instead used an old packet of Making Memories stuff that I've had forever. I decided to do the Scrap Our Stash Tic-Tac-Toe challenge with the sketch. I'm actually going to use the sketch again, as I had to rotate it a lot to make it work, and I want to do a page from it that's pretty much an exact copy.
Here's the result:

Friday, October 25, 2013
Disaster Chef: Snickerdoodle Pancakes #foodiefriday #projectpinterest
 Another disastrous Disaster Chef project here for you today.
This week it’s snickerdoodle pancakes. Remember my post about making
snickerdoodles, and how I didn’t have any cream of tartar? Well, I got some.
And I made snickerdoodles again, and they were everything a snickerdoodle
should be. I was so inspired, in fact, that the next morning I decided I’d make
snickerdoodle pancakes, which I’d seen on pinterest while searching for the
cookie recipe.
Another disastrous Disaster Chef project here for you today.
This week it’s snickerdoodle pancakes. Remember my post about making
snickerdoodles, and how I didn’t have any cream of tartar? Well, I got some.
And I made snickerdoodles again, and they were everything a snickerdoodle
should be. I was so inspired, in fact, that the next morning I decided I’d make
snickerdoodle pancakes, which I’d seen on pinterest while searching for the
cookie recipe.
First let me say, pancakes can be tricky. I did my fair share
of burning them when I started making them a few years ago, and had a number turn out with raw
centers. But my son LOVES pancakes, so I got better at them. In fact, now it’s one
of the few things I consistently rock. I make all varieties—apple, pumpkin,
banana, blueberry, plain…And my son loves them all. Because, let’s face it,
I’ve become a pancake expert.
I was just cooking for my son and me this time, so I halved
the recipe. It can be found here.
 |
| Think this looks moist and soggy? It's worse! |
Snickerdoodle Pancakes
Author: Melissa @ No. 2 Pencil
Recipe type: Breakfast
Cuisine: American
Prep time:
Cook time:
Total time:
Serves: 4
Snickerdoodle Pancakes!
Ingredients
- 1 cup of all-purpose flour
- 3 tablespoons of sugar
- 2 teaspoons of cream of tartar
- ½ teaspoon baking soda
- ½ teaspoon of kosher salt
- 2 teaspoons of cinnamon
- ¼ teaspoon of freshly grated nutmeg
- 1 cup of sour cream
- 4 tablespoons of melted butter
- 1 egg, lightly beaten
- ¼ – ½ a cup of milk
Instructions
- Combine dry ingredients in large bowl and whisk to combine.
- Add wet ingredients and whisk just until combined.
- Use ¼ cup of milk for thicker, fluffy pancakes. Add more milk for thinner, tender pancakes.
- Pour ¼ cup of pancake batter onto hot non-stick griddle.
- When edges of pancakes start to set, flip and cook until light golden brown.
- Serve with butter and warm cinnamon vanilla glaze.
- Makes about 16 pancakes.
 I don’t know if it was the cream of tartar (it seemed like
it called for an awful lot), but the batter was this really weird gelatinous
consistency. I did use plain yogurt in place of sour cream, since I didn’t have
a container of sour cream on hand. But I’ve used this substitution lots of
times, and it’s always worked fine. In fact, I always use yogurt in pancakes,
because it gives them a wonderful tender quality. This time, not so much.
I don’t know if it was the cream of tartar (it seemed like
it called for an awful lot), but the batter was this really weird gelatinous
consistency. I did use plain yogurt in place of sour cream, since I didn’t have
a container of sour cream on hand. But I’ve used this substitution lots of
times, and it’s always worked fine. In fact, I always use yogurt in pancakes,
because it gives them a wonderful tender quality. This time, not so much. |
| Waiting, and waiting, for this to solidify... |
 |
| The one that looked good. |
These things would not cook! Even though the second one looked beautiful, it was all gooey in the middle too. I tried adding more liquid, then more flour, then turning the pan on the lowest setting, which couldn’t burn anything if you left it all day. I left a pancake in there on low for about 20 minutes, even putting a lid on it so the top would cook, even if it turned out cake-like. No. It NEVER cooked. It just solidified the gelatinous goo.
This was a huge disaster, unless you like really gooey,
gummy, sour pancakes. I will never make it again.
The cinnamon glaze was good, though.
Warm Cinnamon Vanilla Glaze
Author: Melissa @ No. 2 Pencil
Recipe type: Glaze
Cuisine: American
Prep time:
Cook time:
Total time:
Serves: 4
A warm cinnamon vanilla glaze to serve on top of Snickerdoodle Pancakes.
Ingredients
- 1 cup of powdered sugar
- 1 teaspoon of pure vanilla extract
- 1 teaspoon of cinnamon
- 3-4 tablespoons of milk
Instructions
- Whisk all ingredients together in a small bowl. Warm in small pan over low heat.
Friday, September 27, 2013
Disaster Chef: Snickerdoodles, Project Pinterest #10 #foodiefriday

My son has been asking me to make him snickerdoodles for a
while now, although I’m pretty sure he only likes the name and doesn’t actually
know what they are. So, we were actually home together one day (never happens)
last weekend with nothing to do (REALLY never happens), so I made good on my
promise and broke out the Pinterest to look for a recipe. Turns out
snickerdoodles require cream of tartar (I know—what the heck is that?), which I
obviously don’t have. I did, however, have everything else, and some of the recipes
said you could use baking soda instead of baking powder and cream of tartar. But
they all said that the cookies wouldn’t have that classic doodle flavor without
the cream of tartar. But I never let lack of ingredients hinder me (see my
cookie cake fiasco if you don’t believe me), so I forged onwards.

Below is the recipe, from Culinary Couture's sweet blog.
Snickerdoodles
Yield: 2 1/2 to 3 dozen cookies
Ingredients:
1 and 3/4 cups + 2 tablespoons all-purpose flour
1/8 teaspoon baking soda
1/4 teaspoon cream of tartar
1/8 teaspoon salt
1/2 cup butter (one stick), room temperature
1 cup sugar
1 egg
2 tablespoons milk
pinch of vanilla powder (or 1/2 teaspoon vanilla extract)
3 tablespoons sugar
1 teaspoon cinnamon
Directions:
Preheat oven to 375 degrees F. Line a cookie sheet with parchment paper.
In a small bowl, whisk together flour, baking soda, cream of tartar, and salt. Set aside.
In a large bowl, beat butter for 30 seconds until creamy. Add sugar, and beat until light and fluffy. Add egg, milk, and vanilla, and beat until well combined.
Gradually pour in dry ingredients, beating after each addition, until well blended. Dough will be slightly sticky, but workable.
In a small bowl, combine 3 tablespoons sugar and 1 teaspoon cinnamon. Shape dough into 1" balls, then roll into cinnamon-sugar mixture. Place on prepared cookie sheet and flatten slightly with the bottom of a glass.
Bake for about 8 minutes. Let cool on cookie sheet for 5 minutes, before transferring to a wire rack to cool completely.


I like to make my cookies pretty big, so I used a little bigger balls (o.O) and didn't make quite as many cookies. They turned out super pretty, but like all the recipes said, they didn't taste quite like they should without the tartar. Will put it on my shopping list if I try again. They turned out a bit dry, but they all got eaten, so I can't say they were a complete failure.

Friday, September 20, 2013
Thirty Day Photo Challenge (Project Pinterest)
Okay, I posted a few weeks ago about week 1 of the Thirty Day Photo Challenge, but then I got busy and never ended up giving updates. And now it's over, so I'm going to sum up the last 3 weeks of it here.
Well, the challenge started out really fun, even though every time I had an outdoor challenge, the weather did not cooperate (not a cloud in the sky when I needed a cloud pic, completely cloudy when I needed a sunset...) However, I forged onwards, sometimes skipping days and making them up later, sometimes switching days. I think the point of this challenge is to take pictures of the assigned topic each day.

 I realized several things about my limited photography skills during this challenge. For one, I'm not very creative or imaginative. Most of my pictures are of myself, Gabe, or flowers/food/animals. I don't think outside the box very well, and of course, having only a cell phone for a camera doesn't help. So, I'm not sure I'd call his experiment a success. But it was one more project I did via Pinterest.

Well, the challenge started out really fun, even though every time I had an outdoor challenge, the weather did not cooperate (not a cloud in the sky when I needed a cloud pic, completely cloudy when I needed a sunset...) However, I forged onwards, sometimes skipping days and making them up later, sometimes switching days. I think the point of this challenge is to take pictures of the assigned topic each day.

But all the cheating seemed to make the challenge not as meaningful. I know some people just go and find a picture of said topic each day, but I really wanted to take the assigned pics each day. But we all have busy lives, and sometimes I just forgot, or couldn't take the right picture when I thought of it. So I wasn't as successful as I would have liked. Here were some of the pics I took.


Sunday, September 15, 2013
Scrappy Sunday: Fourth of July mini-album (Project Pinterest #8)
Hey, guys,

Here is something I've been working on for a while. I'm an incredibly slow scrapper, so this one took me several hours on several different days. But, I think it turned out okay. Not nearly as fabulous and vibrant as the original, but it served its purpose. The original can be seen here, but its all written in what appears to be German, so no instructions if you're an English speaker. But, the pictures were enough for me to do a good adaptation.
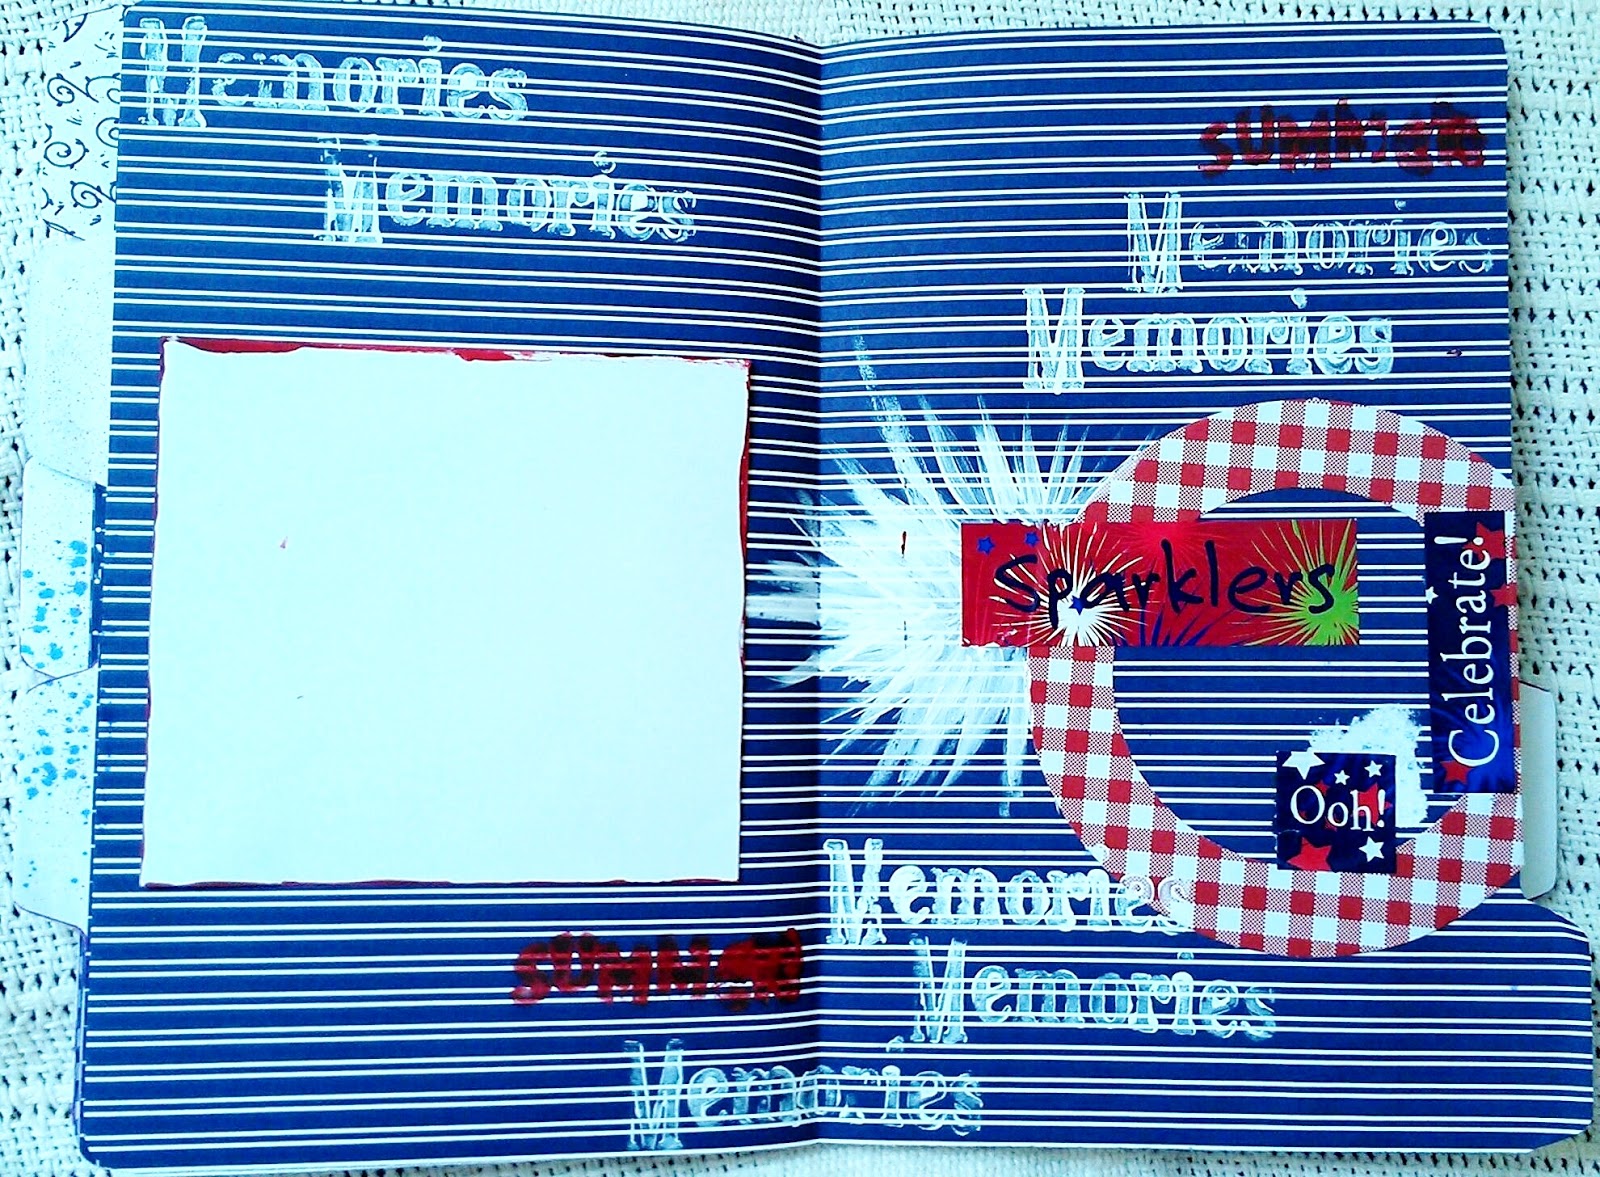
I accidentally did page 1 first, so that became my cover, and later on, I put the cover inside as one of the layouts. This is the front of the album. I used regular pattern paper, but if I was going to do it again, I would use cardstock for the covers at least. I used a file folder design for this. You can see all the tabs. I ran a strip of washi tape along the binding and between each page to hold it all together.
I used paper from Hot Off the Press (navy packet) throughout. The tape is Washi, spray ink by SEI, and my dymo label maker.
 Here's the first layout. I used a bookmark for an accent. Circle punch (Paper Studio), stamp and circle frame (Target dollar bin), acrylic paint (Making Memories), washi tape, index card, and sticker (colorbok).
 This layout has a photo mat, but I didn't put the pics in yet. It fits mostly 4x4 pics. Other supplies: Acrylic paint (Anita's, Making Memories), index card, label maker, sticker (DCWV), staples
 Other supplies: oval frame (part of navy kit), brad, stamps (stampabilities, autumn leaves), sticker (Colorbok), washi tape

Other supplies: USA sticker, chipboard star (paper studio), punch
 Light blue journaling block (Target dollar bin), stickers (Colorbok), chipboard (Paper Studio)
 Additional supplies: Memories Stamp (Hampton Arts)

Additional supplies: journaling spot, stickers (Target dollar bin)
I left some of the pages simple, and really decorated some of them. I left spots open for at least one photo on each page, as well as space for journaling strips, which I will print, cut out, and in after the photos are glued in.
This project was super fun to make. Messy, with all the spray ink and paint.
Happy creating, all!

Here is something I've been working on for a while. I'm an incredibly slow scrapper, so this one took me several hours on several different days. But, I think it turned out okay. Not nearly as fabulous and vibrant as the original, but it served its purpose. The original can be seen here, but its all written in what appears to be German, so no instructions if you're an English speaker. But, the pictures were enough for me to do a good adaptation.
I accidentally did page 1 first, so that became my cover, and later on, I put the cover inside as one of the layouts. This is the front of the album. I used regular pattern paper, but if I was going to do it again, I would use cardstock for the covers at least. I used a file folder design for this. You can see all the tabs. I ran a strip of washi tape along the binding and between each page to hold it all together.
I used paper from Hot Off the Press (navy packet) throughout. The tape is Washi, spray ink by SEI, and my dymo label maker.


Other supplies: USA sticker, chipboard star (paper studio), punch


Additional supplies: journaling spot, stickers (Target dollar bin)
I left some of the pages simple, and really decorated some of them. I left spots open for at least one photo on each page, as well as space for journaling strips, which I will print, cut out, and in after the photos are glued in.
This project was super fun to make. Messy, with all the spray ink and paint.
Happy creating, all!
Friday, September 13, 2013
Disaster Chef: Cookie Cake (Pinterest Project #7)
Though I'm no cook, as most of you know, damned if I wasn’t going to try to make a cookie cake
for my son’s birthday. That was what he wanted, and I figured, it’s just like a
cookie, right? How hard can it be? You don’t even have to separate the dough
into cookies. You just throw the whole mess on a cookie sheet and bake it and,
voila, I’m the mom of the year. Of course that’s not how things turn out in the
Hillbrand household.


 I don’t know that I’ll ever attempt a cookie cake again, as
I was somewhat traumatized, but I will definitely use the frosting recipe
again. It was super easy, creamy and just sweet enough.
I don’t know that I’ll ever attempt a cookie cake again, as
I was somewhat traumatized, but I will definitely use the frosting recipe
again. It was super easy, creamy and just sweet enough.
Frosting:
1 block cream cheese
4 tbs. butter (half stick)
1/2 tbs. vanilla
1 c. powdered/confectioner's sugar
Beat with mixer until smooth and fluffy.
First of all, I got a basic recipe off Pinterest that looked
easy enough. I don’t like frosting, and neither does my son, so I figured I’d
skip that part, which was the only complicated part of the recipe from Chasing Delicious. If you remember from my previous posts,
it’s a difficult thing for me to stick with a recipe. So, again, changes I made
are in parentheses. The coconut oil was a necessity, as I found out once I
began that we only had one stick of butter in the house. It worked out well,
though. I added some whole wheat flour and cut the sugar a bit, but kept it to
a minimum so it wouldn’t taste too ‘healthy’ for the kids at the party. We
didn’t have many chocolate chips, so I chopped up at 3 oz. chocolate bar and
put that in. I would have added white chocolate chips, but we didn’t have any,
so I skipped that part. It still ended up with tons of chocolate, as you will
soon see.
Ingredients:
8 oz. unsalted butter, at room temperature (I used 6oz. butter, 2 oz. solid coconut oil)
6 oz. light brown sugar (4 oz.)
6 oz. granulated sugar (4 oz.)
2 eggs
1 tsp. vanilla extract
13 oz. all-purpose flour (8 oz. white flour, 5 oz. whole wheat)
3/4 tsp. salt (I always skip the salt--I don't like the salty taste in many desserts)
3/4 tsp. baking soda
6 oz. milk chocolate chips (I used about 4 oz dark choc chips)
6 oz. dark chocolate chips (3 oz. Green and Black Organic's 85% cacoa bar, chopped)
4 oz. white chocolate chips (I didn't have these or I would have used them. Instead, I added about half a cup of chopped walnuts).
Instructions:
1. Preheat the oven to 375°F. Line the bottom of the pizza pan with parchment paper and grease the paper and sides of the pan; set aside.
2. Cream together the butter and sugar until light and fluffy, about five minutes.
3. Add the eggs, one at a time, mixing well after each.
4. Add the vanilla and mix in well.
5. Add the flour, salt, and baking soda and mix until a batter forms.
6. Add the chocolate chips and mix until they are evenly distributed.
7. Spread the dough into the pizza pan.
8. Bake in a preheated oven for 20 to 22 minutes until the edges begin to brown and the center has set.
9. Cool in the pan for 10 to 20 minutes until cool enough to handle.
10. Remove from the pan and cool on a wire rack until cool enough to decorate.
11. Decorate with frosting as desired and serve.
8 oz. unsalted butter, at room temperature (I used 6oz. butter, 2 oz. solid coconut oil)
6 oz. light brown sugar (4 oz.)
6 oz. granulated sugar (4 oz.)
2 eggs
1 tsp. vanilla extract
13 oz. all-purpose flour (8 oz. white flour, 5 oz. whole wheat)
3/4 tsp. salt (I always skip the salt--I don't like the salty taste in many desserts)
3/4 tsp. baking soda
6 oz. milk chocolate chips (I used about 4 oz dark choc chips)
6 oz. dark chocolate chips (3 oz. Green and Black Organic's 85% cacoa bar, chopped)
4 oz. white chocolate chips (I didn't have these or I would have used them. Instead, I added about half a cup of chopped walnuts).
Instructions:
1. Preheat the oven to 375°F. Line the bottom of the pizza pan with parchment paper and grease the paper and sides of the pan; set aside.
2. Cream together the butter and sugar until light and fluffy, about five minutes.
3. Add the eggs, one at a time, mixing well after each.
4. Add the vanilla and mix in well.
5. Add the flour, salt, and baking soda and mix until a batter forms.
6. Add the chocolate chips and mix until they are evenly distributed.
7. Spread the dough into the pizza pan.
8. Bake in a preheated oven for 20 to 22 minutes until the edges begin to brown and the center has set.
9. Cool in the pan for 10 to 20 minutes until cool enough to handle.
10. Remove from the pan and cool on a wire rack until cool enough to decorate.
11. Decorate with frosting as desired and serve.
So, here I got the cookie dough and spread it on the
parchment paper as directed, on a flat pizza pan. It looked all round and
wonderful. I was starting to actually feel quite pleased with myself.
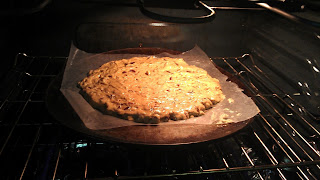 I put the
cake in the oven. About five minutes later, I thought that since I wasn’t going
to frost the cake, I should make a big chocolate 7 on top of the cake. So I
grabbed a pot holder and opened the oven and pulled out the pizza tray. The
tray came sliding out, and the parchment paper with the cookie did not. It slid
off the back of the tray into the oven. The paper couldn’t support the weight
of the melting cookie dough and proceeded to dump a huge sliding glop of
chocolatey goodness into the bottom of the oven. I might have screamed. I may
have cursed under my breath. I grabbed the paper and pulled it back onto the
tray. Luckily I was able to salvage most of the cookie. I had a time trying to
scrape the chocolate mess from the bottom of the oven, though. All that
chocolate had melted, so it looked like chocolate cake batter by the time I had
scraped it to the edge of the oven. Chunks of it fell down between the door of
the oven and the oven itself, but I managed to get enough of it out that it
wasn’t smoking.
I put the
cake in the oven. About five minutes later, I thought that since I wasn’t going
to frost the cake, I should make a big chocolate 7 on top of the cake. So I
grabbed a pot holder and opened the oven and pulled out the pizza tray. The
tray came sliding out, and the parchment paper with the cookie did not. It slid
off the back of the tray into the oven. The paper couldn’t support the weight
of the melting cookie dough and proceeded to dump a huge sliding glop of
chocolatey goodness into the bottom of the oven. I might have screamed. I may
have cursed under my breath. I grabbed the paper and pulled it back onto the
tray. Luckily I was able to salvage most of the cookie. I had a time trying to
scrape the chocolate mess from the bottom of the oven, though. All that
chocolate had melted, so it looked like chocolate cake batter by the time I had
scraped it to the edge of the oven. Chunks of it fell down between the door of
the oven and the oven itself, but I managed to get enough of it out that it
wasn’t smoking.


Then I had the cake to worry about. Since the dough was
still all melty, I was able to reform it into a roughly circular shape. But all
the melted chocolate made the parts that had been disturbed brown, while the
rest of the cake looked like a chocolate chip cookie. It was entirely hideous!
I might have started over at this point, except that…I had no butter. It would
have taken 45 minutes to run to the store to get some and get back, and I
didn’t have that much extra time before I had to get my son to his birthday
party. So, I soldiered on with my wounded cookie cake.
When it was done, I pulled it out and let it cool, as
directed in the recipe. Then I transferred it to a wire rack, whereupon it
broke in several places. I had already decided I’d have to frost it to conceal
the mottled color, so I figured it would be okay. I also broke off a little
piece near one of the cracks to make sure it was edible, and it wasn’t half
bad. When it had cooled completely, I was ready to frost it. I had quite some
trouble getting the paper off the bottom of it, so I’d recommend pulling that
off when transferring it to the wire rack to cool…if that’s something that
someone else doesn’t know to do! As a newby, I had no idea. I’m pretty sure I’ve
never used wax paper before, or I’d probably have known to grab the edge along
with the pan when I removed it from the oven!
Now I was ready to frost the cake, but of course I had no
frosting, since no one in the house likes it. And as it turns out, you need
butter to make frosting. I searched several recipes until I found this one,
which was the simplest I could find. I searched through the fridge and both
freezers and, lo and behold, I found a rogue stick of butter in the freezer!
Finally, something was going right.

I set the butter on top of the stove for a while, but it
didn’t seem to be thawing and I really needed to get going. So I threw it in
the oven, which by now was almost totally cool and hadn’t been on for a few
hours. Now here you can tell me I’m really stupid, because I didn’t put it in a
bowl or anything. But it was frozen solid, so I just threw it in and ran to
take a quick shower. I came hurrying back, opened the oven, and found a big
pool of oil in the bottom of the oven and a little chunk of butter in a wrapper
on the rack. I definitely screamed, and, since my son wasn’t in the room,
cursed thoroughly. Then I rescued the remaining butter and set to work on the
frosting. Luckily, I had just enough (minus one tablespoon) for the frosting. I
spread a thin layer on the cooled cake, which (mostly) masked the more
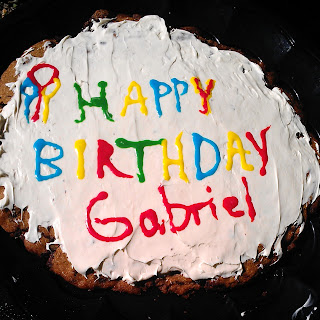
unappetizing aspects. Then I attempted a clumsy “Happy Birthday” on top in
colored icing. I felt very fortunate that my son was too excited about his
birthday to even care about the cake, and was completely forgiving even though
it was an epic fail. However, it was a hit at the party despite the appearance.
Even my mom liked it, and she hates cookie cake. The walnuts totally made the
cake. They were just what it needed to make it a little different from the
generic. And, the frosting was amazing.

Frosting:
1 block cream cheese
4 tbs. butter (half stick)
1/2 tbs. vanilla
1 c. powdered/confectioner's sugar
Beat with mixer until smooth and fluffy.
Overall rating:
Cake-3
Frosting-5
Monday, September 9, 2013
Thirty Day Photo Challenge (Week 1): Pinterest Project #6
As some of you know, if you follow me through other media sources like FB, Twitter, and Instagram, I am doing a thirty day photo challenge. These were popular a couple years ago, although I haven't seen many around lately. Still, I had never done one, and when I stumbled across one on Pinterest, I figured I'd give it a shot. A couple of days I cheated and used a photo I already had, like when I was supposed to take a picture of clouds, and of course on that day, not a cloud in the sky. Otherwise, I tried to use a photo I took that day for the purpose of the challenge.
Here's the challenge list.

Here's the first week's results.


Here's the challenge list.

Here's the first week's results.

And here is my favorite picture from Week 1, which deserves a picture all by itself b/c it's so beautiful and glowy, and I didn't do anything to it except write on it. No photo editing, no filters. Just a gorgeous ripe peach from the fruit stand near our house, sitting on the table in a shaft of sunlight.

Friday, September 6, 2013
Disaster Chef: Being Underprepared When Cooking (Black Bean Crunchy Tacos) Project Pinterest
It had gotten a little late last Saturday, and before I’d
realized, it was dinner time and I didn’t have anything planned, let alone
cooked. So of course I went right to Pinterest, and within minutes, I had found
a quick, easy dish.

The recipe is from over at Endless Simmer. Here is the one I attempted to follow, not too faithfully, as you'll soon see.
Ingredients
- 2 C. black beans, cooked
- ½ C. red onion, minced
- 1 tsp. cumin
- 1 tsp. paprika
- 2 Tbsp. cilantro, chopped
- 4-6 ounces pepper jack cheese, grated
- 2 Tbsp. olive oil
- 1 avocado, sliced
- Pinch of salt and pepper
- 8 corn tortillas
- Hot sauce
- Salsa
- Sour cream
Instructions
- 1) In a medium bowl, add beans along with red onion, cilantro, and spices. Add a pinch of salt and lightly mash all of the ingredients together. Grate your cheese and have it ready as well.
- 2) In a large, non-stick skillet or cast iron skillet, add a few tablespoons of oil and heat over medium-high heat.
- 3) Add one corn tortilla at a time and let each get hot in the oil for a few seconds. Then add about 1?4 cup of the bean filling to one half of the tortilla. Top with a sprinkle of grated cheese.
- 4) Using a spatula, carefully fold the tortilla over so it forms a shell. Press down lightly on the tortilla so it holds its shape.
- 5) As the first tortilla cooks, move it to the side and do a second one. Depending on the size of your pan, you should be able to get 2 or 3 tacos at once. If you have a griddle you can do even more at once.
- 6) Cook each taco for about 3 minutes per side until they are nicely browned and crispy.
- 7) When flipping the taco to cook on the other side, use a spatula and flip the taco toward the fold so the filling doesn’t fall out.
- 8) Serve tacos with toppings like hot sauce, salsa, avocados, and sour cream.
- Note: Corn tortillas are resilent to heat. Don’t worry about burning them. They are very flexible. Just be sure to cook them on each side long enough to get them really crispy.
 I started getting out the ingredients, but of course, as
soon as I did, I realized I didn’t have most of what I needed. But I’m the
queen of substitution, so I stuck with it. Instead of black beans, I used a can
of great northern beans, which was all we had. I thought it might be a little
weird in tacos, but by the time it was all made and piled high with toppings (*see pic), you couldn’t really taste the
beans, anyway.
I started getting out the ingredients, but of course, as
soon as I did, I realized I didn’t have most of what I needed. But I’m the
queen of substitution, so I stuck with it. Instead of black beans, I used a can
of great northern beans, which was all we had. I thought it might be a little
weird in tacos, but by the time it was all made and piled high with toppings (*see pic), you couldn’t really taste the
beans, anyway.
I had no Jack cheese, so I used cheddar. I had no cilantro.
Basically, I had nothing I needed! But this just goes to show that you can
adapt pretty much anything in this recipe and it will still turn out great. I
didn’t have a red onion, so I used a small yellow one, making sure it wasn’t
too spicy before I used it, since my son won’t eat spicy food (and since my
husband was out of town, I didn’t have to worry about my onion breath). Still,
I was going to cook the onion, since I’m not a big fan of raw onions. But it
was so sweet that I left it raw, as the recipe says. I was trying to stick to
the directions, at least, since I had to substitute all the ingredients.
I minced the onion super fine, and mashed everything with a
potato masher, like it says. Not too thorough, you don’t want bean soup. Also,
if you use a can of beans, as I did, you should pour off most of the liquid in
the top of the can, and you can skip the salt.
 I went to get the tortillas from the fridge, only to find
that we had only two white corn tortillas, somewhat fused together. I live on
tortillas! There are always about 3 bags of them floating around the fridge.
But of course the one time I need them for a recipe, we are out. I pried apart
the two remaining tortillas and cooked them as directed. I don’t know how the
recipe’s original cook fit half a cup of beans in a corn tortilla, but I would
like to know! I put maybe half that in each of mine, and it still spilled out while cooking.
I went to get the tortillas from the fridge, only to find
that we had only two white corn tortillas, somewhat fused together. I live on
tortillas! There are always about 3 bags of them floating around the fridge.
But of course the one time I need them for a recipe, we are out. I pried apart
the two remaining tortillas and cooked them as directed. I don’t know how the
recipe’s original cook fit half a cup of beans in a corn tortilla, but I would
like to know! I put maybe half that in each of mine, and it still spilled out while cooking.
They cooked great, though,
just like she said. Nice and crunchy on the outside. And delicious all the way through.
My son moaned and groaned that he hated tortillas and
didn’t want a taco, but even he admitted, as he took the last bites of his
taco, that it was “kind of good.” Success!
Sunday, August 18, 2013
Scrappy Sunday: Map picture frame (Pinterest Project #4)
Here is the very first project I ever made from Pinterest. It was so easy, how could I resist? Plus, I love maps. I love pictures. And I'd never decorated a picture frame before, though I'd always wanted to.
 I didn't go look up the website and follow directions or anything. I
just found a map I'd picked up on my travels to Florida, and used a
picture from the same trip. I used mod podge to glue and finish the
frame. I tore the map into pieces and kind of decoupaged them all
together. Then I used some sea shells I picked up on the beach on the
same trip to finish it out, and added a metal title and a ribbon.
I didn't go look up the website and follow directions or anything. I
just found a map I'd picked up on my travels to Florida, and used a
picture from the same trip. I used mod podge to glue and finish the
frame. I tore the map into pieces and kind of decoupaged them all
together. Then I used some sea shells I picked up on the beach on the
same trip to finish it out, and added a metal title and a ribbon.

Monday, August 5, 2013
Manicure Monday! (Pinterest Project #2)
If you've been following my blog, you know I'm writing personal stuff now, more or less. So, here is the next pin I've done in Project Pinterest. This one was a patriotic nail I did. I actually cheated, because I did this one a while back, for the Fourth of July.
 I'm not much of a nail-painter, and I have to say, I'm not very good at it! I tried to do a nail project off Pinterest last year and it was an epic fail. I ended up with spilled vodka and torn up newspaper all over my bathroom floor. This time, I tried for something a little less ambitious. I found a pin with ten patriot nail projects. I picked one that looked relatively easy, abandoned any ideas on making stars, and went for silver instead of white, because that's what I had. I didn't try to get perfect stripes, either. I like this one, because I could totally use it for candy-cane stripes at Christmas, too. Here's how they looked.
 I painted a couple coats of silver (Gabriel brand) on first, then did the red stripes. Then added blue (Gabriel again) on a nail of each hand, then free-handed the silver dots. I figured everyone would know what they were supposed to be, even if they weren't perfect little stars!
 The silver polish has a foil-like texture after it dries, and a whole fingernail of paint came off in one big flake the second day! You can see in the bottom pic that the little finger is not painted...it's because the paint fell off! I know they look all sloppy compared to people who use stencils and have fake nails and all that. But, I'm not a professional. I just did it for fun, and I liked the way it turned out. I even did my toes after I finished the fingernails. I felt so festive, and got lots of compliments. I may even do a different one next year!
 I'm not much of a nail-painter, and I have to say, I'm not very good at it! I tried to do a nail project off Pinterest last year and it was an epic fail. I ended up with spilled vodka and torn up newspaper all over my bathroom floor. This time, I tried for something a little less ambitious. I found a pin with ten patriot nail projects. I picked one that looked relatively easy, abandoned any ideas on making stars, and went for silver instead of white, because that's what I had. I didn't try to get perfect stripes, either. I like this one, because I could totally use it for candy-cane stripes at Christmas, too. Here's how they looked.
  I painted a couple coats of silver (Gabriel brand) on first, then did the red stripes. Then added blue (Gabriel again) on a nail of each hand, then free-handed the silver dots. I figured everyone would know what they were supposed to be, even if they weren't perfect little stars!
Friday, August 2, 2013
Disaster Chef: Foodie Friday! (Pinterest Project #1)
Okay, so I don't usually blog about personal stuff, like what I'm eating. But lately I've realized just how many pins I've accumulated on pinterest, so I decided to start actually doing some of them. So...without further ado, Project Pinterest was born. I'm vowing to make at least one thing from my Pinterest boards every week, whether it's a recipe or a craft project or a diy.
The one I chose this week was a recipe. I got back from vacation and hadn't gone to the grocery store, so the fridge was looking awfully empty. I found some dried beans in the pantry and put them on to cook in the slow cooker. Then I went to Pinterest for some inspiration.
I found a recipe for Great Northern Bean stew, and miraculously, I had most of the ingredients. Anyone who has ever been around me when I'm cooking knows that it's practically impossible for me to follow a recipe exactly. I always adapt, substitute, or in some other way make the recipe my own. This one was no different. I can't say it worked out exactly as planned, but it was edible.
First of all, it called for canned beans, which I didn't use. I put the beans in the Crock-Pot with 3x the water and an onion. Then I left it to cook. I checked it a few times, since I was home all day. It seemed like the beans were taking forever to soften up. So I left it alone for a few hours. When I came back, the beans were completely cooked. Oops...I was supposed to add some vegetables somewhere along the way.
I had to take the beans out and set them aside. Then I put the veggies in the slow-cooker with some water and left for about an hour. When I came back, the water wasn't even boiling. I had to abandon the slow-cooker and put them in a pot on the stove. They still took ages to cook! Meanwhile, my husband had come home. Luckily, he was patient as I checked the veggies every 5 minutes for what seemed like an hour. I didn't have enough carrots, so I used the quarter bag of baby carrots I had in the fridge and added a turnip in place of the rest. I also used fresh basil, since we have plenty. I added about 2 tablespoons of chopped fresh basil before it cooked, then added another 2 tbs of fresh basil and cilantro about 5 minutes before it was done. I added the beans back in, and a little bit of extra cloves. I didn't have frozen corn, so I cut kernels off an ear of fresh corn that was lurking in the vegetable drawer while I was on vacation. Also, since I used dried beans instead of canned, I had to add some extra salt.

Thankfully, it turned out quite edible. I don't know that I'll make it again, as I like stews with more vegetables. But this one wasn't bad. It's quite filling, and vegetarian for those interested.
Here's the original recipe from Greener Eating via Pinterest, along with my adaptations in parentheses.
The one I chose this week was a recipe. I got back from vacation and hadn't gone to the grocery store, so the fridge was looking awfully empty. I found some dried beans in the pantry and put them on to cook in the slow cooker. Then I went to Pinterest for some inspiration.
I found a recipe for Great Northern Bean stew, and miraculously, I had most of the ingredients. Anyone who has ever been around me when I'm cooking knows that it's practically impossible for me to follow a recipe exactly. I always adapt, substitute, or in some other way make the recipe my own. This one was no different. I can't say it worked out exactly as planned, but it was edible.
First of all, it called for canned beans, which I didn't use. I put the beans in the Crock-Pot with 3x the water and an onion. Then I left it to cook. I checked it a few times, since I was home all day. It seemed like the beans were taking forever to soften up. So I left it alone for a few hours. When I came back, the beans were completely cooked. Oops...I was supposed to add some vegetables somewhere along the way.
I had to take the beans out and set them aside. Then I put the veggies in the slow-cooker with some water and left for about an hour. When I came back, the water wasn't even boiling. I had to abandon the slow-cooker and put them in a pot on the stove. They still took ages to cook! Meanwhile, my husband had come home. Luckily, he was patient as I checked the veggies every 5 minutes for what seemed like an hour. I didn't have enough carrots, so I used the quarter bag of baby carrots I had in the fridge and added a turnip in place of the rest. I also used fresh basil, since we have plenty. I added about 2 tablespoons of chopped fresh basil before it cooked, then added another 2 tbs of fresh basil and cilantro about 5 minutes before it was done. I added the beans back in, and a little bit of extra cloves. I didn't have frozen corn, so I cut kernels off an ear of fresh corn that was lurking in the vegetable drawer while I was on vacation. Also, since I used dried beans instead of canned, I had to add some extra salt.

Thankfully, it turned out quite edible. I don't know that I'll make it again, as I like stews with more vegetables. But this one wasn't bad. It's quite filling, and vegetarian for those interested.
Here's the original recipe from Greener Eating via Pinterest, along with my adaptations in parentheses.
3 c. water (I used 2 cups of dried beans, so 6 cups of water, more later for cooking the veggies)
1 T. vegetable broth powder (I skipped this)
1 to 2 c. potatoes, diced (I used probably 3 cups)
2 carrots, diced or grated (here I used 1 large turnip and a handful of chopped baby carrots)
1 large sweet onion, chopped (I cooked one in the beans, and added another small one w/ veggies)
1 clove garlic, minced (1/2 t. fridge garlic) (I used 3 cloves)
2 T. fresh cilantro (see above)
1 T. dried basil (see above)
2 t. chili powder
1/4 t. ground cloves (doubled this)
1 t. salt (doubled this)
2 cans great northern beans, undrained* (I used 2 cups dried, about 4 cooked)
1 c. frozen sweet white corn** (Kernels off one ear of corn. If I made it again, I'd use more corn for sure).
Subscribe to:
Posts (Atom)