Showing posts with label recipes. Show all posts

Friday, August 29, 2014

Disaster Chef: Cinnamon Roll Pancakes

When I found this recipe on Recipe Girl a few months ago, I knew I wanted to make it even though it is soooo not healthy. But sometimes, you just gotta indulge. In this instance, my son asked me to make them, and I told him I'd make them for his birthday. Of course I then forgot all about it. But he didn't. On his birthday morning, he reminded me, so I put them together. They do take a loooong time, since they have 3 different components. I wouldn't just whip these up any day, since they took hours to make. But for special occasions, yes. My son already asked me to make them again for his next birthday. Knowing him, he'll remember, too.
Without the frosting.
For these, you have to make the cinnamon swirl, the pancakes, and the frosting.

First, I made the cinnamon swirl.
4 tablespoons (1/2 stick) butter,  melted
1/4 cup + 2 tablespoons packed light brown sugar
1/2 tablespoon ground cinnamon
Mix ingredients and pour into a ziplock sandwich bag. Set aside.
Next, I made the frosting. I'm not sure why mine turned out so dark, maybe the vanilla I used was too dark? I used pretty much exactly what the recipe specified, but mine was sort of caramel colored instead of a nice pearly white like the original recipe:
4 tablespoons (1/2 stick) butter
2-ounces cream cheese, at room temperature
3/4 cup powdered sugar
1/2 teaspoon vanilla extract
Melt the butter, then stir other ingredients into pan, mixing well after each addition.
On with the pancakes. Mix together
1 cup all-purpose flour
2 teaspoons baking powder
1 cup milk
1 large egg, lightly beaten
Mix together flour and baking powder, then other ingredients, mixing until moistened but still a bit lumpy.

Pour about 1/4 c. batter for each pancake into a skillet and let cook a couple minutes before cutting corner out of sandwich bag and drawing the circle on the pancake.You might have to squish the baggie a bit if the cinnamon mixture has separated. It should be toothpaste consistency as it squeezes out of bag.
Once turned, the cinnamon swirl melts into the pan, leaving a crispy, sugary, hollowed out swirl pattern in the pancake.
Turn it out onto a plate with the swirl side up. Drizzle with frosting to finish. They don't need anything extra--no butter or syrup.

As I said, these were sinfully delicious. I never use white flour exclusively, but I really wanted these to taste like cinnamon rolls, so I did this time. They were very decadent and delicious, very sweet and rich. I would make them again for special occasions, but not for an ordinary day. They are an indulgence for sure.


Friday, August 22, 2014

Disaster Chef: Cheesy Beer Bread

I found this recipe quite a while ago, but like most pins on pinterest, I pinned it and forgot it. But then I saw the stray can of beer that's been hanging out in my refrigerator for a couple months, and I went to pinterest to see if I could find something to do with it.

This bread is based on a recipe I found at Gotta Get Baked blog. It's definitely worth checking out her blog, if only for the gorgeous pictures. My bread was gorgeous, but my pictures don't do it justice. Her pictures are awesome. Plus, she's kind of hilarious.

Anyhow, this is how I adapted her recipe.

You will need:
1 cup grated cheddar cheese
1/2 cup onion, finely chopped
1 1/2 c. whole wheat flour
1 1/4 cups all-purpose flour
1 tbsp baking powder
1 12 oz. can or bottle of beer
1 tbsp honey


If you will notice, there is no butter or oil in this bread. I thought that was weird, because every time I've made quick bread, it has a lot. And eggs--this one has no eggs, either. I was confused until I mixed up the batter and realized that the yeast activates and makes bread dough (duh--but I really hadn't thought of that until I mixed it up and it was all sticky like yeasted bread dough).

Now, let's put it all together. 
Preheat the oven to 375 degrees.
Grease a loaf pan.
In a large bowl, mix together the flour and baking powder. Add 3/4 c. of the shredded cheese and onion; toss together so that everything is well combined. At this point, everything will be so coated with flour it will be white.
Add the beer and honey. Mix until all dry bits of flour are absorbed/moistened. Your dough will be lumpy and sort of sticky, but it shouldn't be as moist as cake batter. This should be more like dough.
Dump the dough into the loaf pans and smooth the top of the dough.
It will look about so at this junction.
Bake for about 25 minutes, then add the last 1/4 c. cheese to the top of the loaf.
Half baked and covered in cheese.
 Return to oven and bake for 15-25 more minutes.
Hot and fresh out the oven.
 I had to bake for all 50 minutes before a knife in the center came out clean. It looked done at 40 minutes, but the knife came out all gooey. At 50 minutes, it was completely clean. I let the bread sit about 10-15 minutes, then turned it out and set it on a rack for a few minutes.

Textured, yeasty goodness within.
My son absolutely LOVED this bread. He kept picking at it while it cooled. We ate it warm with pork chops and braised red cabbage with apples. It was delicious warm. He ate 2 pieces, and my husband had 3. It was a big hit, and delicious the next day, too.
Cheesy, crispy goodness without.

Friday, August 15, 2014

Disaster Chef: Blueberry Peach Cheesecake Bars

I'm deep into my Fanny & Me blogging, but sometimes, I just have to make something that's not from Fannie Farmer. She doesn't have a whole lot of newer recipes, since the cookbook is over a hundred years old. So, no cheesecake bars. 

I found this recipe I'd pinned on Pinterest a long time ago, and since I happen to have both blueberries AND peaches right now, I had to try it. Plus, it's got a nut crust, which I really like. So, for anyone doing the gluten free thing, this recipe is worth a shot. In fact, check out this blog where it originates--she has a lot of great recipes like this.
Peaches and blueberries, oh my!


Here's my adapted version.

Putting it in the oven.
 Ingredients
All puffed up and ready to eat.
  • 1 c almond butter
  • 2-4 tbsp finely shredded coconut
  • 6 oz cream cheese (at room temperature)
  • ½ c plain yogurt
  • 4 tbsp. xylitol (or sugar)
  • 1 tsp vanilla
  • 3 large eggs
  • ½ c blueberries
  • ½ c diced peaches


Instructions
Yuuuuummmmm.
  1. Preheat your oven to 350 degrees. In a small bowl, combine the almond butter and coconut and mix well. I may use more coconut next time, or use almond flour like the original recipe does, because mine were a bit too almond buttery.
  2. Spread crust mixture into an 8×8 baking pan. Bake at 350 for 10 minutes then remove from the oven to cool.
  3. In a large bowl combine the cream cheese, sugar, vanilla and yogurt and mix well with a hand mixer (or stand) for about 2 minutes on medium speed. Add the eggs one at a time, continuing with mixer.
  4. Pour the cheesecake mixture over the crust (crust doesn’t have to be completely cooled). Top the cheesecake mixture with the blueberries and peaches. The blueberries sank into mine, so if you want them on top, I'd wait until the cheesecake has cooked 10-20 mins before adding them.
  5. Bake the bars at 350 for 40-50 minutes (until the cheesecake is set).
  6. Cool completely then cut into bars and serve.
 These turned out pretty well. The 'crust' I used was just almond butter and coconut, and it was just a little too...almond buttery. Next time, I'll probably use almond meal how the original recipe does. Or at least some kind of nut flour. This was just too wet somehow. Also, I don't think I added quite enough sugar in the cheesecake part. I only used 2 tbsp. but next time, I will definitely use 4. And yes, there will be a next time. This recipe is easy, good, and healthy. Can't wait to make it again.


Friday, August 1, 2014

Disaster Chef: Buckwheat Noodles with Honey Lime Sauce

Finished product.
I was looking for a good recipe to make with buckwheat noodles, which I LOOOOVE, so I grabbed one off pinterest. I like more veggies in my meals so I used a whole carrot. I then discovered I didn't have any green onions, so I used about 1/4 of a regular onion and fried it (along with the grated carrots, since I don't really like raw carrots much).

I followed the dressing recipe from Joylicious blog  closely, though!

Ingredients
  • Handful of buckwheat soba noodles (the ones I get come in handy serving-sized portions)
  • 1/2 lime, squeezed (I didn't have a fresh lime, so I used about 2tbs. lime juice from a bottle)
  • 1 tablespoon soy sauce
  • 2 teaspoons honey
  • 2 teaspoons sesame oil
  • 1/2 carrot, shredded (I grated one whole carrot and sauteed it...the next time I made it, I also added a couple sliced mushrooms and some shredded cabbage and sauteed everything...it was delicious!)
  • 1 tablespoon toasted sesame seeds (I didn't have these so I left them out)
  • small handful of cilantro, cleaned and chopped
  • 1 tip of a green onion, cleaned and chopped (I used 1/4 of regular onion, sauteed)
  • 1 teaspoon oil
  • 2 eggs
The sauce mix.
Instructions
  1. In a medium pot fill with water and bring to boil. Drop noodles in and cook for 4 minutes at medium heat at a gentle boil.
  2. Rinse carrots and herbs and pat dry. Shred carrot and set aside. Finely chop cilantro and green onion and mix with shredded carrots (and if you're me, saute them now).
  3. Test to see if noodles are semi firm, if so turn heat off immediately. Allow pasta to further cook in the hot water for an additional 2 minutes. Meanwhile prepare the dressing.
  4. In a bowl combine lime juice, soy sauce, honey, sesame oil and sesame seeds. Whisk well and set aside.
  5. Test noodles for preferred firmness/softness and strain. Return noodles to pot and mix in carrots, herbs and dressing.
  6. In a medium pan, heat oil over medium high heat. Crack egg(s) carefully into pan and fry until edges are browned and whites are set (sunny side up). Flip over and cook for about 1 minute for over easy, ~ 2 minutes for over medium, ~3 minutes for over hard. (I did all this in the same pan, just pushing the veggies to the sides and frying the eggs in the middle, then tossing it all on top of the noodles and sauce, and mixing it as I ate to get some sauce on the veggies).
  7. To serve: Place noodles in a bowl and top with fried eggs. Feel free to add a dash of chile powder or chile sauce for an extra punch!

This recipe is wonderful, because it is so versatile and easy! I've made it three times, changing it every time. Sometimes I add extra veggies, sometimes I use only one egg, sometimes I add chili powder or cayenne on top. It's one of my favorite Pinterest recipes, and I think it's the only one I've gotten around to more than once. I love buckwheat noodles, and I've made this three times in the last month. I think I'll just add whatever veggies I have on hand, keeping the noodles, dressing and cilantro the same every time.

Recipe:  5 spoons of easiness
Outcome: 5 spoons of deliciousnsess

Friday, February 7, 2014

Disaster Chef: Taco Casserole (project pinterest) (ammended Weight Watcher's recipe)

I found a recipe for Taco Casserole on Pinterest last fall, but when I went back for it, the blog was gone. Super disappointed, since it looked awesome. I really wanted to make it anyway, so I searched and of course about a hundred recipes came up. After reading a few, I settled on this one, which sounded good.


Unfortunately, it was a Weight Watcher's recipe, which stands for everything I'm against! If it works for you, my apologies, and good job. So I'm posting the recipe below, along with my NOT low-fat recommendations.


1 lb extra lean ground beef (drained or rinsed!) (...NO NO NO! Do not use lean meat, and do not rinse. Saturated fat is not the enemy! lol...seriously, regular grass-fed beef, no draining and dear lord no rinsing...are you trying to remove all taste?!)                                     
  • 1/2 cup onion (chopped)
  • 1/4 cup canned jalapeno slices, chopped (I skipped these, since my son doesn't like spicy food, but I also put salsa on top once it was done)                                           
  • 2 cups fresh tomatoes, chopped or 1 (15 ounce) can diced canned tomatoes
  • 1 (15 ounce) can kernel corn (drained) (I used frozen corn since that's what I had)
  • 1 (15 ounce) can black beans (rinsed and drained) (Used red beans, since I had some cooked)                                    
  • 1 (1 1/4 ounce) package taco seasoning mix (chili powder, cumin and salt did the trick).                                          
  • 8 corn tortillas
  • 3/4 cup nonfat sour cream (REGULAR)                                                  
  • 1/3 cup reduced-fat Mexican cheese blend, shredded (About a cup of regular shredded cheese on top was perfect)                                          
  • 1/3 bunch fresh cilantro, chopped, to taste (or less (or more) 
  • (GARNISH: I USED SALSA, OLIVES, SOUR CREAM, LETTUCE, CILANTRO)                                    

  • Directions:

    1. 1
      Brown ground beef and chopped onions in large skillet; brown 10 to 12 minutes or until thoroughly cooked, stirring constantly. Drain well and rinse with warm water to remove all fat; return beef/onions to skillet. (Please don't wash your beef. It's weird).
    2. 2
      Add corn, black beans, tomatoes, chilies/jalapenos and taco seasoning mix; mix well. Reduce heat; simmer 5 minutes.
    3. 3
      Meanwhile spray 12x8-inch (2-quart) baking dish with nonstick cooking spray. Cut each tortilla in half; place 8 halves in bottom of sprayed baking dish, overlapping slightly.
    4. 4
      Spoon half of beef mixture evenly over tortillas. Spoon sour cream over beef mixture; spread evenly. Top with remaining 8 tortilla halves and remaining beef mixture. (Cover tightly with foil & Freeze for later OR cook as directed below…).
    5. 5
      (Thaw overnight if frozen) Heat oven to 350ºF. Bake at 350ºF for 25 minutes. Remove from oven; sprinkle with cheese. Cover; let stand 5 minutes or until cheese is melted. Sprinkle with chopped cilantro and serve with fresh chopped lettuce, tomatoes, salsa, black olives, etc… /.
    6. 6
      Makes 6 large Servings at 6.5 weight watcher pts/each.

    It turned out pretty tasty, especially after garnishes. Without that, it was a little plain. Also, the corn I used was really sweet for some reason, and tasted a little off in the recipe. I might leave out the corn next time. But, there will definitely be a next time. It was really tasty, and pretty easy to make. It did take a bit of time, but it was worth it. Everyone liked it, picky-eater son included, though he said he'd rather have tacos next time.


    Friday, January 17, 2014

    Disaster Chef: Baked French Toast (Project Pinterest)


    This was a recipe I tried out during Christmas break when my family was here. My son isn't the biggest fan of French toast because he says it's too soggy, but he loved this. The recipe can be found here, on Parade.

    Here's the recipe:


    Ingredients

    • 1 (12½ oz) loaf of favorite bread (such as challah), cut into 1-inch-thick slices
    • 3 cup whole milk
    • 7 large eggs
    • ½ cup light-brown sugar
    • ¼ cup real maple syrup, plus more for serving
    • 2 tsp pure vanilla extract
    • 2 tsp cinnamon
    • ¼ tsp nutmeg

    Directions

    1. Generously butter a 13 x 9–inch casserole. Arrange bread slices in dish, staggering in rows.
    2. In large bowl, beat together milk, eggs, brown sugar, maple syrup, vanilla, cinnamon, and nutmeg. Pour over bread and press down, making sure slices absorb liquid. Cover with foil.
    3. Refrigerate overnight.
    4. Preheat oven to 350°F. Remove foil and bake casserole 55 minutes to 1 hour, until puffy and golden. Serve with more maple syrup, if desired. 


    I used whole wheat bread and spread it out on two dishes because when I layered the bread, it wasn't under the milk. We only had 2 cups of milk, so I used that and a half cup of half & half. Our chickens definitely don't lay large eggs, so ours were small. I used only 2 tbsp. of sugar and syrup, and 1 tbsp. of cinnamon and 1/2 tsp nutmeg. I baked until the bread got puffy and took it out. It got nice and crisp on top, and everyone liked it, even my son, since it was not at all soggy.

    Friday, October 11, 2013

    Disaster Chef: Cheesy Zucchini Cups: #foodiefriday #projectpinterest

    So, I had this post all planned out, only to realize all my pics from this recipe were erased in my phone crash. I decided to do the post anyway. The pictures weren't that great, anyway!

    Sometimes you have some ingredients, and you want to use them, but you don't know what to make... This was one of those times. I had some zucchini from my mom's garden, and I didn't want to waste it. And that's pretty much all I had, at least the only fresh vegetables I had for a side dish. So of course I headed straight to Pinterest and found this recipe.

    It sounded simple and easy and good. So I started to make it. Here's the recipe and directions.

    Ingredients
    1 cup zucchini grated
    1 egg
    1/4 cups yellow onion diced
    1/4 cups cheese (cheddar or Parmesan work the best)
    1/4 cups bread crumbs (I used Italian Style)
    2 tablespoons fresh parsley, finely chopped
    Salt and Pepper

    Directions
    1. Preheat oven to 400F. Spray a mini-muffin tin with non-stick spray, set aside.
    2. Grate the zucchini and then place in a dish towel to squeeze out the excess water- like when using frozen spinach; if you skip this part, the middle of the zucchini tots will be really soggy while the outside gets crispy and no one wants that.
    3. In a bowl combine, the egg, onion, cheese, bread crumbs, zucchini, parsley, salt and pepper.
    4. Using a spoon or a cookie scoop, fill the muffin cups to the top. Bake for 15-18 minutes, or until the top is browned and set.


    I grated a huge zucchini, which took forever. Then I squeezed all the liquid out by hand, since I didn't have any paper towels. With clean hands, just pick up handfuls of the stuff and squeeze until the liquid drips out. I did the same with an onion. Then I went to get out the rest of the ingredients...only to find that my husband had no eggs and no bread to make bread crumbs. So again I will advise...when cooking, get out all the ingredients before you begin!

    I had already grated the vegetables, and I wasn't about to throw them out. Oh, yeah, did I also mention that my husband doesn't have muffin tins? I kind of made the 'batter' into blobs and formed thin cookies out of them, hoping they'd cook all the way through, even in the centers. Did they turn out well,  you ask? Well...in a word...No. They did not. They didn't hold together well without the egg, and the centers never got really nice and cooked. They were a little crunchy, and not in the good way.
    In the undercooked-onions way.

    I might actually try these again, because they were SUCH a disaster that I'd like to try them again. The recipe sounded good. I just need to go shopping before I try them again!

    Friday, September 27, 2013

    Disaster Chef: Snickerdoodles, Project Pinterest #10 #foodiefriday


    My son has been asking me to make him snickerdoodles for a while now, although I’m pretty sure he only likes the name and doesn’t actually know what they are. So, we were actually home together one day (never happens) last weekend with nothing to do (REALLY never happens), so I made good on my promise and broke out the Pinterest to look for a recipe. Turns out snickerdoodles require cream of tartar (I know—what the heck is that?), which I obviously don’t have. I did, however, have everything else, and some of the recipes said you could use baking soda instead of baking powder and cream of tartar. But they all said that the cookies wouldn’t have that classic doodle flavor without the cream of tartar. But I never let lack of ingredients hinder me (see my cookie cake fiasco if you don’t believe me), so I forged onwards.


    Below is the recipe, from Culinary Couture's sweet blog. 


    Snickerdoodles

    Yield: 2 1/2 to 3 dozen cookies


    Ingredients:
    1 and 3/4 cups + 2 tablespoons all-purpose flour
    1/8 teaspoon baking soda
    1/4 teaspoon cream of tartar
    1/8 teaspoon salt
    1/2 cup butter (one stick), room temperature
    1 cup sugar
    1 egg
    2 tablespoons milk
    pinch of vanilla powder (or 1/2 teaspoon vanilla extract)

    3 tablespoons sugar
    1 teaspoon cinnamon

    Directions:
    Preheat oven to 375 degrees F. Line a cookie sheet with parchment paper. 

    In a small bowl, whisk together flour, baking soda, cream of tartar, and salt. Set aside.

    In a large bowl, beat butter for 30 seconds until creamy. Add sugar, and beat until light and fluffy. Add egg, milk, and vanilla, and beat until well combined.

    Gradually pour in dry ingredients, beating after each addition, until well blended. Dough will be slightly sticky, but workable.

    In a small bowl, combine 3 tablespoons sugar and 1 teaspoon cinnamon. Shape dough into 1" balls, then roll into cinnamon-sugar mixture. Place on prepared cookie sheet and flatten slightly with the bottom of a glass.

    Bake for about 8 minutes. Let cool on cookie sheet for 5 minutes, before transferring to a wire rack to cool completely. 

    I like to make my cookies pretty big, so I used a little bigger balls (o.O) and didn't make quite as many cookies. They turned out super pretty, but like all the recipes said, they didn't taste quite like they should without the tartar. Will put it on my shopping list if I try again. They turned out a bit dry, but they all got eaten, so I can't say they were a complete failure. 


    Friday, September 13, 2013

    Disaster Chef: Cookie Cake (Pinterest Project #7)

    Though I'm no cook, as most of you know, damned if I wasn’t going to try to make a cookie cake for my son’s birthday. That was what he wanted, and I figured, it’s just like a cookie, right? How hard can it be? You don’t even have to separate the dough into cookies. You just throw the whole mess on a cookie sheet and bake it and, voila, I’m the mom of the year. Of course that’s not how things turn out in the Hillbrand household.

    First of all, I got a basic recipe off Pinterest that looked easy enough. I don’t like frosting, and neither does my son, so I figured I’d skip that part, which was the only complicated part of the recipe from Chasing Delicious. If you remember from my previous posts, it’s a difficult thing for me to stick with a recipe. So, again, changes I made are in parentheses. The coconut oil was a necessity, as I found out once I began that we only had one stick of butter in the house. It worked out well, though. I added some whole wheat flour and cut the sugar a bit, but kept it to a minimum so it wouldn’t taste too ‘healthy’ for the kids at the party. We didn’t have many chocolate chips, so I chopped up at 3 oz. chocolate bar and put that in. I would have added white chocolate chips, but we didn’t have any, so I skipped that part. It still ended up with tons of chocolate, as you will soon see.

    Ingredients:
    8 oz. unsalted butter, at room temperature (I used 6oz. butter, 2 oz. solid coconut oil)
    6 oz. light brown sugar (4 oz.)
    6 oz. granulated sugar (4 oz.)
    2 eggs
    1 tsp. vanilla extract
    13 oz. all-purpose flour (8 oz. white flour, 5 oz. whole wheat)
    3/4 tsp. salt (I always skip the salt--I don't like the salty taste in many desserts)
    3/4 tsp. baking soda
    6 oz. milk chocolate chips (I used about 4 oz dark choc chips)
    6 oz. dark chocolate chips (3 oz. Green and Black Organic's 85% cacoa bar, chopped)
    4 oz. white chocolate chips (I didn't have these or I would have used them. Instead, I added about half a cup of chopped walnuts).
    Instructions:
    1. Preheat the oven to 375°F. Line the bottom of the pizza pan with parchment paper and grease the paper and sides of the pan; set aside.
    2. Cream together the butter and sugar until light and fluffy, about five minutes.
    3. Add the eggs, one at a time, mixing well after each.
    4. Add the vanilla and mix in well.
    5. Add the flour, salt, and baking soda and mix until a batter forms.
    6. Add the chocolate chips and mix until they are evenly distributed.
    7. Spread the dough into the pizza pan.
    8. Bake in a preheated oven for 20 to 22 minutes until the edges begin to brown and the center has set.
    9. Cool in the pan for 10 to 20 minutes until cool enough to handle.
    10. Remove from the pan and cool on a wire rack until cool enough to decorate.
    11. Decorate with frosting as desired and serve.

    So, here I got the cookie dough and spread it on the parchment paper as directed, on a flat pizza pan. It looked all round and wonderful. I was starting to actually feel quite pleased with myself.
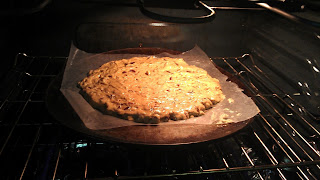
    I put the cake in the oven. About five minutes later, I thought that since I wasn’t going to frost the cake, I should make a big chocolate 7 on top of the cake. So I grabbed a pot holder and opened the oven and pulled out the pizza tray. The tray came sliding out, and the parchment paper with the cookie did not. It slid off the back of the tray into the oven. The paper couldn’t support the weight of the melting cookie dough and proceeded to dump a huge sliding glop of chocolatey goodness into the bottom of the oven. I might have screamed. I may have cursed under my breath. I grabbed the paper and pulled it back onto the tray. Luckily I was able to salvage most of the cookie. I had a time trying to scrape the chocolate mess from the bottom of the oven, though. All that chocolate had melted, so it looked like chocolate cake batter by the time I had scraped it to the edge of the oven. Chunks of it fell down between the door of the oven and the oven itself, but I managed to get enough of it out that it wasn’t smoking.

    Then I had the cake to worry about. Since the dough was still all melty, I was able to reform it into a roughly circular shape. But all the melted chocolate made the parts that had been disturbed brown, while the rest of the cake looked like a chocolate chip cookie. It was entirely hideous! I might have started over at this point, except that…I had no butter. It would have taken 45 minutes to run to the store to get some and get back, and I didn’t have that much extra time before I had to get my son to his birthday party. So, I soldiered on with my wounded cookie cake.

    When it was done, I pulled it out and let it cool, as directed in the recipe. Then I transferred it to a wire rack, whereupon it broke in several places. I had already decided I’d have to frost it to conceal the mottled color, so I figured it would be okay. I also broke off a little piece near one of the cracks to make sure it was edible, and it wasn’t half bad. When it had cooled completely, I was ready to frost it. I had quite some trouble getting the paper off the bottom of it, so I’d recommend pulling that off when transferring it to the wire rack to cool…if that’s something that someone else doesn’t know to do! As a newby, I had no idea. I’m pretty sure I’ve never used wax paper before, or I’d probably have known to grab the edge along with the pan when I removed it from the oven!

    Now I was ready to frost the cake, but of course I had no frosting, since no one in the house likes it. And as it turns out, you need butter to make frosting. I searched several recipes until I found this one, which was the simplest I could find. I searched through the fridge and both freezers and, lo and behold, I found a rogue stick of butter in the freezer! Finally, something was going right.

    I set the butter on top of the stove for a while, but it didn’t seem to be thawing and I really needed to get going. So I threw it in the oven, which by now was almost totally cool and hadn’t been on for a few hours. Now here you can tell me I’m really stupid, because I didn’t put it in a bowl or anything. But it was frozen solid, so I just threw it in and ran to take a quick shower. I came hurrying back, opened the oven, and found a big pool of oil in the bottom of the oven and a little chunk of butter in a wrapper on the rack. I definitely screamed, and, since my son wasn’t in the room, cursed thoroughly. Then I rescued the remaining butter and set to work on the frosting. Luckily, I had just enough (minus one tablespoon) for the frosting. I spread a thin layer on the cooled cake, which (mostly) masked the more unappetizing aspects. Then I attempted a clumsy “Happy Birthday” on top in colored icing. I felt very fortunate that my son was too excited about his birthday to even care about the cake, and was completely forgiving even though it was an epic fail. However, it was a hit at the party despite the appearance. Even my mom liked it, and she hates cookie cake. The walnuts totally made the cake. They were just what it needed to make it a little different from the generic. And, the frosting was amazing.
    I don’t know that I’ll ever attempt a cookie cake again, as I was somewhat traumatized, but I will definitely use the frosting recipe again. It was super easy, creamy and just sweet enough.

    Frosting:
    1 block cream cheese
    4 tbs. butter (half stick)
     1/2 tbs. vanilla
    1 c. powdered/confectioner's sugar
    Beat with mixer until smooth and fluffy.

    Overall rating:
    Cake-3
    Frosting-5

    Friday, September 6, 2013

    Disaster Chef: Being Underprepared When Cooking (Black Bean Crunchy Tacos) Project Pinterest


    It had gotten a little late last Saturday, and before I’d realized, it was dinner time and I didn’t have anything planned, let alone cooked. So of course I went right to Pinterest, and within minutes, I had found a quick, easy dish.
    The recipe is from over at Endless Simmer. Here is the one I attempted to follow, not too faithfully, as you'll soon see. 


    Ingredients
    • 2 C. black beans, cooked
    • ½ C. red onion, minced
    • 1 tsp. cumin
    • 1 tsp. paprika
    • 2 Tbsp. cilantro, chopped
    • 4-6 ounces pepper jack cheese, grated
    • 2 Tbsp. olive oil
    • 1 avocado, sliced
    • Pinch of salt and pepper
    • 8 corn tortillas
    • Hot sauce
    • Salsa
    • Sour cream
    Instructions
    1. 1) In a medium bowl, add beans along with red onion, cilantro, and spices. Add a pinch of salt and lightly mash all of the ingredients together. Grate your cheese and have it ready as well.
    2. 2) In a large, non-stick skillet or cast iron skillet, add a few tablespoons of oil and heat over medium-high heat.
    3. 3) Add one corn tortilla at a time and let each get hot in the oil for a few seconds. Then add about 1?4 cup of the bean filling to one half of the tortilla. Top with a sprinkle of grated cheese.
    4. 4) Using a spatula, carefully fold the tortilla over so it forms a shell. Press down lightly on the tortilla so it holds its shape.
    5. 5) As the first tortilla cooks, move it to the side and do a second one. Depending on the size of your pan, you should be able to get 2 or 3 tacos at once. If you have a griddle you can do even more at once.
    6. 6) Cook each taco for about 3 minutes per side until they are nicely browned and crispy.
    7. 7) When flipping the taco to cook on the other side, use a spatula and flip the taco toward the fold so the filling doesn’t fall out.
    8. 8) Serve tacos with toppings like hot sauce, salsa, avocados, and sour cream.
    9. Note: Corn tortillas are resilent to heat. Don’t worry about burning them. They are very flexible. Just be sure to cook them on each side long enough to get them really crispy.


    I started getting out the ingredients, but of course, as soon as I did, I realized I didn’t have most of what I needed. But I’m the queen of substitution, so I stuck with it. Instead of black beans, I used a can of great northern beans, which was all we had. I thought it might be a little weird in tacos, but by the time it was all made and piled high with toppings (*see pic), you couldn’t really taste the beans, anyway.

    I had no Jack cheese, so I used cheddar. I had no cilantro. Basically, I had nothing I needed! But this just goes to show that you can adapt pretty much anything in this recipe and it will still turn out great. I didn’t have a red onion, so I used a small yellow one, making sure it wasn’t too spicy before I used it, since my son won’t eat spicy food (and since my husband was out of town, I didn’t have to worry about my onion breath). Still, I was going to cook the onion, since I’m not a big fan of raw onions. But it was so sweet that I left it raw, as the recipe says. I was trying to stick to the directions, at least, since I had to substitute all the ingredients.
    I minced the onion super fine, and mashed everything with a potato masher, like it says. Not too thorough, you don’t want bean soup. Also, if you use a can of beans, as I did, you should pour off most of the liquid in the top of the can, and you can skip the salt. 

    I went to get the tortillas from the fridge, only to find that we had only two white corn tortillas, somewhat fused together. I live on tortillas! There are always about 3 bags of them floating around the fridge. But of course the one time I need them for a recipe, we are out. I pried apart the two remaining tortillas and cooked them as directed. I don’t know how the recipe’s original cook fit half a cup of beans in a corn tortilla, but I would like to know! I put maybe half that in each of mine, and it still spilled out while cooking.


    They cooked great, though, just like she said. Nice and crunchy on the outside. And delicious all the way through.

    My son moaned and groaned that he hated tortillas and didn’t want a taco, but even he admitted, as he took the last bites of his taco, that it was “kind of good.” Success!

    Friday, August 30, 2013

    Disaster Chef: Foodie Friday: Stuffed Zucchini, Squash, and Peppers

    Today I'm putting aside Project Pinterest to share one of my very own recipes. It is super simple and delicious.

    I started out trying to find a recipe on Pinterest for stuffed zucchini, but I couldn't find any that matched what I wanted to do. I already had in my head what it should be like. I found quite a few recipes, but none that looked like what I wanted. So, I kind of winged it (that's my usual cooking style anyway). They turned out really well! I was so dern proud of my little old self for making something tasty that I just had to share my own recipe. I later used this same exact formula for making peppers, and they were also excellent.

    First, I put on some brown rice to simmer, since it takes 40-45 minutes. I left the timer on for this, and asked my sister to turn the stove off when it went off, and I took a little walk. Of course she didn't turn it off, even though she was home, so the rice got a little scorched. But I managed to salvage all but the bottom layer, which by this time was hopelessly fused to the bottom of the pan. The rest of it tasted fine, so I forged onwards. Word of warning, do not count on others to turn off your food, even if you set the timer, even if they are going to be eating said food!

    I would recommend just letting your rice simmer while you do the rest of the dish.

    First, cut your squash lengthwise into halves and scoop out the seedy soft part in the center. Save this and cut it into small pieces. (If you're using peppers, just cut out the stem and core, pull out any veins and seeds you can and tap the top of the pepper on the cutting board to knock loose any seeds. Throw that stuff out).

    Then you will put the hollowed out veggies in a steamer basket and steam them for a few minutes if you don't want them to take a long time to bake. (If you have an hour or so to bake them, you can skip this step).


    While your veggies to stuff are steaming, cook the stuffing. You will need:

    Ground meat--beef or sausage (I used about 1/2lb for 6 small zucchini/squash)
    1/2 large onion
    2 large tomatoes, or a 16 oz can diced/chopped/stewed tomatoes with juice
    1-2 cloves garlic
    olive oil for frying
    1 bell pepper chopped, any color (omit this if you're making stuffed peppers)
    handful of fresh basil (or dried if you don't have fresh)
    a few pinches of fresh oregano (or dried)
    grated cheese (any kind)
    parmesan cheese

    Put olive oil in your pan and fry your onions and peppers for a few minutes. Then add the meat and zucchini innards and saute until cooked through. Add tomatoes, cooked rice, parmesan and basil and simmer for 2-3 minutes.

    Now, retrieve your zucchini or peppers from the steamer. If they are still firm, that fine. I'd try to steam them for about 10 minutes after water comes to boil.

    Spoon filling into zucchini, squash, or peppers, top with cheese and fresh oregano. Bake for 15-20 minutes. If you're stuffing raw veggies, 40 minutes to an hour will be needed to cook them. If all your ingredients are already hot, these cook super fast! 

    I cooked these in a bread pan, so they wouldnt tip over. Worked great!
    I also added some very mild homemade salsa to one batch and it turned out great. When I made stuffed peppers, I used 2 fresh tomatoes and 1 c. canned tomatoes. Feel free to experiment and mix it up!